So, it is a Browning Spec Ops Advantage purchased from NHBS.

Night vision is provided by "invisible" infra-red LEDs. Trail cameras are usually equipped with "low-glow" LEDs which have a peak output about 840nm which is just visible to humans and most mammals as a dull red glow. Alternatively, they can be equipped with "no glow" LEDs with peak output above 900nm which are beyond the visible range of us and most other mammal species (hence referred to as "invisible" or "black-light" in the advertising). The advantage of "no-glow" LEDs is that they are less likely to disturb the wildlife or be spotted (and stolen!) by other humans. The disadvantage is that, because they are harder for the sensor to detect they produce less bright images or have to be run at a greater intensity and hence, consume more battery power. I have found that the night-time images are fine for my garden. The claimed range is 80 feet, but I haven't had occasion to use it at anything like that range.
Speaking of power, it uses 8 x AA batteries which fit in a metal tray.

The manual insists that alkaline batteries are necessary and advises the use of extremely expensive and environmentally unfriendly Lithium batteries. If you look at Browning's web-site it says it should not be used with rechargeable batteries. This is rubbish! It works fine with NiMh rechargeable batteries - which is what I have been using (Panasonic Eneloop Pro 2500 mAh). It won't run for so long though on rechargeables and, when a freshly charged set are inserted, only about 76% battery capacity is reported. The web-site gives various tables on how long you can leave it out - which, of course, depends very much on how often it is triggered, whether you are taking photos or videos and the length of videos it is set to record- the greatest drain being use of the LEDs to record videos at night. I have just recharged my batteries for the second time. So it has run for something like 2.5 months on a charge, sometimes recording several hundred, 10s videos in a night and rarely less than 30-40.
I had one early, bad experience. I set the camera up in a position that put it in full sunshine in the middle of the day with the sun shining directly on the metal back plate of the camera. It got too hot to touch and cooked a set of batteries! They were ruined and wouldn't hold a charge thereafter. So be careful how you site you camera.
Another important feature, when choosing a trail camera, is the trigger time and recovery time. Trigger time is the interval between the camera detecting movement and the shutter being fired. This is setable between 0.4 and 0.7s on this model. 0.4s is at the low end, though there are camera offering down to 0.2s.I find it has been good enough for my use. There are times when something has run or flown through the field of view where you only get a fleeting glimpse of it disappearing off the edge of the frame, but these are rare. The recovery time, it the interval before it can be triggered again and is 0.8s on this model - although you can set it longer. If there is a lot of activity, it may be good to set a longer pause between triggers or you may be overwhelmed (and run the batteries flat very quickly)!
Setting up is fairly straightforward. There is a door on the front of the lower portion of the camera body, which is secured by a pretty formidable clip - so little chance of it coming undone accidentally.

Behind the door, you can see the 2 inch, colour LCD screen which allows you to view what the camera is seeing when positioning it and also to check what it has recorded. The former use is invaluable, I can't imagine how you would set the camera up without being able to see what it is seeing, but I wouldn't like to have to actually view my recordings on this tiny screen. Like most LCDs, it is pretty difficult to see in bright conditions. Beside it is the on/off switch and a mode button which switches between the main modes of the menu system. Below that is the menu navigation set of switches with "E" for enter in the middle and up-down and left-right selector switches arranged around it. Finally, the battery tray eject button is at the lower-right. This is a pretty stiff catch and the getting the battery tray in or out usually is a bit of a struggle - it does not slip in or out easily! On the side, you can see the slot for the SD card. A fairly high spec SD card is recommended, mine is a 32GB cat 10. The files for a 10s HD 30 fps video are typically around 13-18Mb.
The menu system is explained fairly well in the manual, but you will certainly need the manual handy if you want to change settings. The most basic operations are initially setting the time and date and selecting the main parameters of still or video, resolution and, if you are capturing video, the fps (30 or 60) and duration. One useful setting allows you to keep recording video as long as movement is detected up to a max of 5 minutes, providing there is enough light so as not to require illumination with the IR LEDs. I have it set to take 10s video clips with this feature enabled - and have occasionally got 5 minute videos during daylight, but I frequently get videos up to 20s or so at night when an animal stays in view. I think the suppression when the LEDs are used is not complete.
Browning is an American company (although the camera says "Made in China" on it) and somethings about it are resolutely American. Pictures and videos have an (optional) strip along the bottom on which the time, date, temperature and other details are shown. You can set the temperature to Celsius, thank goodness, but you cannot set the date to European format - you are stuck with "mm/dd/yyyy" - which I do find rather annoying! It would seem reasonable to allow the date format to be set as well as the temperature units.
The camera comes with a strap for fixing it to a tree. The strap goes through slots cut in a metal plate fixed to the back of the camera and there is a closed-cell foam pad that fits over this - going between the back of the camera and the tree or post. The strap is about 5 feet long, so will go round a pretty big tree.


Various mounting devices, security locks and secure mounting boxes are available as accessories - although they are pretty pricey! Clearly, if you leave it out in the woods somewhere, there is always a chance that somebody else will find it and pinch it! Whilst padlocking it to a tree may help deter the casual thief, if somebody spots it out in the wilds and really wants it, you are not going to stop them easily.
Trail cameras are triggered by a Passive Infra-Red (PIR) detector of the type commonly used in burglar alarms. What this looks for is a moving object that is significantly warmer than its background. So mammals and birds work fine. I find that, in my garden, pigeons, Blackbirds, squirrels and even Robins trigger it. So I think it would work fine to detect something like Hedgehogs in your garden and is ideal for Fox, Badger, deer and the neighbour's cat and children. However, you do get plenty of false positives: on a bright, sunny, day vegetation warmed by the sun and waving in the wind, especially if its background is in shadow will trigger it and in very windy weather when vegetation is thrashing about wildly, it can get triggered almost continuously - so you can end up with dozens or even hundreds of useless videos to delete!
Results
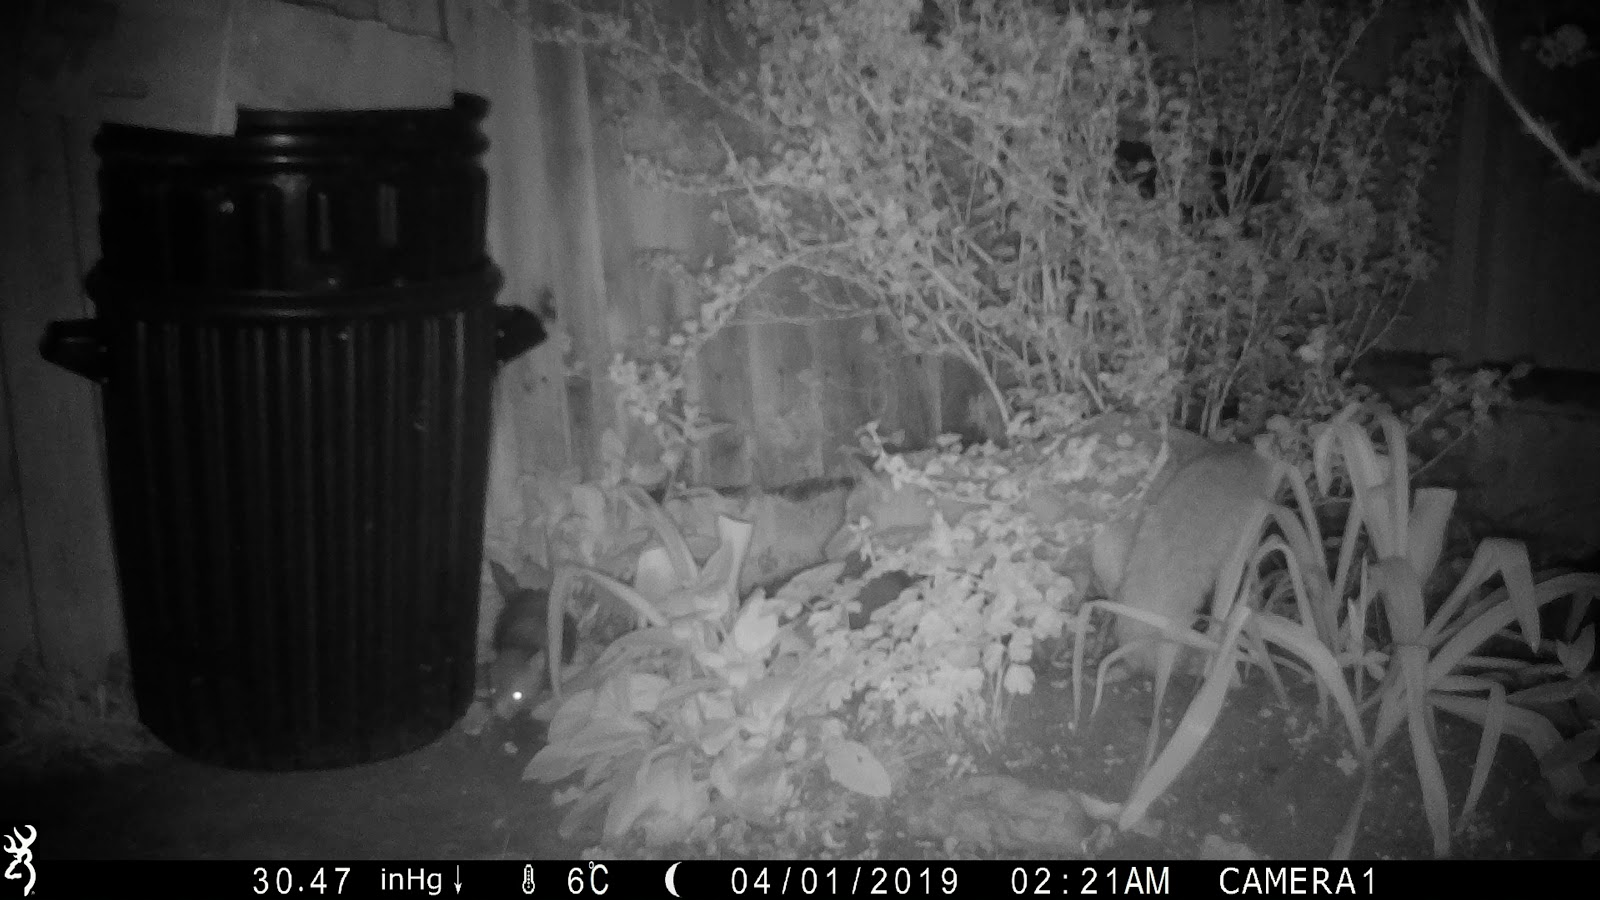
In our resident fox family, mom has an injured front leg and limps very noticeable. We think it is an old injury that has healed. When cubs jump on her, she shows no sign of pain or avoidance. She seems to cope extremely well with her disability. She had 4 cubs initially. Here is the first time we saw a cub above ground - taken at 2am on 1st April as you can see from the strip added to the bottom photo. This is lit by the IR LEDs so you can see the darkening towards the corners where the illumination isn't reaching as well and eye-shine is very evident:
Here is a daylight video of mom with her four cubs taken early evening on 1st May. At this time they were very regularly out during the afternoon, especially if it was warm and sunny:
Here is a much later compilation of clips taken on 19th July. These were taken early in the morning, so there is not enough light for colour, but there is enough not to rely entirelyon the IR LEDs - so the scene is evenly lit. Down to 3 cubs at this time, and here they are having a play with mom on the lawn:
And here is a more recent compilation showing how they jump the 2m high fence between our garden and our neighbour's. The first clip is a night shot with LED illumination, the second is shot around dawn, so B&W but evenly illuminated and the final clip is in daylight. Mom can jump that fence despite her limp!