Monday, September 30, 2013

Time for spiders

This is the time of year when orb web spiders are very noticeable. My garden is festooned with the large webs of the Common garden orb spider (Araneus diadematus). There has been one just outside the kitchen window for some time and the spider tends to sit in the middle of it, especially in the evening towards dusk.


These spiders have a retreat at the end of one of the main strands supporting their web, somewhere like a curled over leaf, where they take what they have caught once they have wrapped it up and subdued it. This one has got a bee I think:


This picture shows the cross shaped pale marking on the abdomen which is characteristic of this large and very variably coloured spider.

I went to Woodwalton Fen yesterday (lovely, sunny Sunday) mainly to try and photograph dragonflies, especially the Ruddy darter (Sympetrum sanguineum). But I also came across a very striking black and yellow orb spider which I don't think I have seen before. A bit of searching through the books suggested that it was Araneus marmoreus var pyramidatus. The "Country Life book of spiders" (Dick Jones) says that this is "very local in Eastern England".


The map from the NBN Gateway shows  the bias towards eastern England quite well. The 10km square in which Woodwalton Fen is located (TL28) is already marked!

Grid map for Araneus marmoreus from NBN Gateway retrieved 30/09/2013

Friday, September 27, 2013

Remote shutter release

For macro work, or indeed for shots taken through a long lens, a tripod and some way of releasing the shutter remotely are often necessary. Jabbing at the shutter release button with your finger is asking for camera shake!

Three possibilities are open to me:
  1. The camera's self timer
  2. A wireless infrared remote such as the Canon RC-6
  3. A wired remote such as the Canon RS-60
Newer models, the 6D and 7D, also have the possibility of a WiFi link to a smartphone running a suitable app, but I don't have either of those cameras.

Using the camera's self timer is not really feasible when you are photographing animals. The time it takes to select either a 2 or 10 second delay via the drive mode settings and then wait out the delay, probably means you have missed the shot. I do sometimes use this method for stationary subjects such as flowers and fungi. I normally select the 2 second delay.

Infrared wireless remotes don't usually work from behind the camera when you are out of doors. The problem is that the little window that receives the infrared signal from the controller is located on the front of the camera, so you really need to be in front of the camera, directing the remote towards it. Presumably this is intended for self portraits. The RC-6 has a stated range of 4m, so it will often work from behind the camera when you are shooting indoors because the beam will be reflected by walls and other nearby surfaces. Out of doors however, there is rarely a suitable surface in range for it to bounce off.

So that leaves us with wired remotes such as the RS-60. I use mine frequently and find it an ideal replacement for the cable release I was used to in the days of mechanical shutters. It simply plugs into the 2.5mm jack socket on the side of the camera (under a rubber flap). The button works just like the camera's shutter release: Half pressure causes the camera to wake up, meter and focus; full pressure fires the shutter.


A nice touch is the notches on the sides to facilitate wrapping the cable round it when not in use, and the hole in the end to insert the 2.5mm jack so that the wire is held nicely in place whilst it is in the camera bag.


I have two small criticisms:
  • The release button is in a sort of slider which allows you to lock it down for "Bulb" mode long exposures (night shots, astro-photography, etc). But it is a bit too easy to operate by accident! It needs some sort of click mechanism or something so that you have to definitely want it before it operates.
  • The shutter release button is at the wrong end! It is at the end where the wire comes out. It seems natural to me, for some reason, that this button should be at the other end, furthest from the wire. Because it seems wrong to me, I am forever losing the button and having to think about where it is - which just occasionally loses me a shot! Perhaps it is because the first one of these gadgets I owned was the Olympus equivalent for the OM2 - and that had the button "the right end"! 
The shutter release button with sliding lock
The electronics are very straight forward. It is simply a pair of instant contact switches which complete a circuit. One switch triggers the focus, the other triggers the shutter. The wiring of the 2.5mm jack plug is described here from which this diagram is taken.

2.5mm stereo jack plugs are readily available, from Maplin for example, so it is easy enough to make your own devices. For example, I have wired up a security pressure pad to trigger the shutter (actually, it was for the autodrive of my old Olympus OM2N - but same principle). In this case the switch (pressure pad) would just be wired between the sleeve and the tip of the jack plug. The camera is pre-focussed, so the focus switch is not needed. It is then possible to set up a camera trap, e.g. bury the pressure pad across the entrance to a badger sett, so that an animal emerging steps on the pad, completes the circuit and fires the shutter.

Badger emerging from a drain taken using a camera trap based on a pressure pad wired as a remote shutter release. Scanned from a slide taken in 1982!

Thursday, September 26, 2013

Canon 100mm macro F2.8 L vs non-L version

I bought a Canon 100mm macro F2.8L USM IS lens second hand on eBay earlier in the week. I have been thinking about upgrading from the non-L version for some time and finally bit the bullet when I managed to win an auction at what I thought was a pretty reasonable price. The lens arrived very quickly and seems to be in good, fully working condition. Anyway, I have both lenses at the moment whilst I decide what to do with the non-L lens (sell it on eBay?).

I have looked at a number of comparative reviews and most agree that there is not a lot to choose between these lenses in terms of image quality. The L version turns in a slightly higher MTF rating, but both are very good. The L also has a 9 bladed iris and turns in slightly more pleasing bokeh. However, the L lens has Image Stabilisation and the usual L-series sealing against weather and dust. After talking to a number of other people with the L lens or with Sigma macro lenses with IS, I am convinced that this facility is worth having!

Anyway, it was a nice sunny afternoon, so I rushed out into the garden to try them out on the same subjects and in the same lighting. These pairs of images were been treated the same way - cropped to the same size and then rescaled to the same extent for the web-site. I haven't done any sharpening on any of them.

Here is a male Helophilus pendulus that was hanging about the pond, perching mostly on fallen leaves from a nearby Acer that were floating on the water surface. These were taken using available light with the camera mounted on a tripod and focussing rail. The exposures are the same: F11, 1/125, ISO400.

Canon 100mm macro F2.8L USM IS

Canon 100mm macro F2.8 USM

These shots of the Garden orb-spider Araneus diadematus (I think the wrapped up prey item is a bee) were taken rather later on when the light was fading, so I used flash. Again, the camera was mounted on a tripod and focussing rail and a Yongnuo YN565EX flash positioned to the right and above the spider with a reflector (a piece of white foam core board) held as close a possible on the opposite side. The exposure was F22, 1/250, ISO100 with -2/3EV flash exposure compensation dialled in to avoid burning out the cross marking on the spider's back.

Canon 100mm macro F2.8L USM IS
Canon 100mm macro F2.8 USM
The next pair are 100% crops of shots of flies resting on the garden shed roof in the evening sunshine. They were both taken with the camera on a tripod and focussing rail using manual focus with the magnification set to 1:1. These were taken a few days apart and so the exposures are not exactly the same. The top one is a Blow fly (Lucilia probably sericata, Calliphoridae), the bottom one is a Flesh fly (Sarcophaga, Sarcophagidae):

Canon 100mm macro F2.8L USM IS (F11, 1/8, ISO100)

Canon 100mm macro F2.8 USM (F16, 1/4, ISO100, with mirror lock-up)

I don't see much difference in image quality between the two lenses. It is possible to discern some additional sharpness in the leaf surfaces underneath both subjects and the eye facets and bristles of the two flies from the L lens.

Tuesday, September 24, 2013

Lesser Stag Beetle

We have a wood burning stove and, consequently, stacks of wood all over the garden. Since we have had these, we have had Lesser Stag Beetle (Dorcus parallelipipedus) turning up in the garden, but not terribly abundantly - maybe once or twice a year.

Lesser Stag Beetle
Many of our neighbours have donated wood from their gardens and we were offered some large chunks of timber that had been used as edging for a raised bed. These were extremely rotten at the bottom where they had been in contact with the ground. On cutting them up, we found they were riddled with the larvae of this species. They are typical 'C' shaped Scrabaeid larvae found in rather large tunnels filled with frass.

Lesser Stag larva

Like the Stag Beetle (Lucanus cervus), these larvae take quite a long time to develop. The Stag takes about 5 years to complete its larval development, whilst the Lesser Stag takes 3-4 years. Decayed wood, after all, is not a particularly nutritious food.

Monday, September 23, 2013

Trundle Mere lookout

Trundle Mere Lookout is a new hide at the northern edge of Holme Fen NNR which looks out over the Rymes Reedbed area of the Great Fen Project. It was officially opened in June, but was closed in August due to fire damage from vandalism and reopened on 3 September. Yesterday (Sunday 22 Sept) was the first time I have been there. As you can see from the photos, it was a lovely sunny afternoon (the car's thermometer showed 26°C).
side view

approach ramp from the pathe along the edge of Holme Fen
Rymes Reedbed is a big project to create a large area of reedbeds to the north of Holme Fen in an area that was historical on the edge of Whittlesey Mere. This involves lowering the land level by removing peat - which will then be used to build up the banks around some of the main drains which run through the Great Fen in order to be able to retain water on the site. Work started in the winter of 2012 and will eventually create 30-40 hectares of wetland.

The view from the new hide is mostly ruderal fields and piles of soil with a few, rather distant pools. It looks across Farcet Fen with the ridge on which Yaxley and Farcet sit to the left and Ramsey wind farm more or less straight ahead. The following panorama is composed from seven shots stitched together and covers about 180°:

view from the lookout
We were there about half an hour and saw five species of birds of prey: 1 Hobby, 2 Kestrels, 2 Red Kites, 4 Buzzards and an adult female Marsh Harrier (plus Sparrowhawk which flew over the road where we parked the car). This is a pretty typical list for the Great Fen area or the nearby Nene Washes, but quite an extravaganza for one spot is such a short period! The only other bird of note was a Greenshank on one of the pools. Here is a very noisy, digiscoped record shot:

Digiscoped Greenshank

Sunday, September 22, 2013

Burghley Park Fallow Deer

It was a lovely clear sunny morning so I popped up to Burghley Park, Stamford for a look at the Fallow Deer. Rutting should start in a couple of weeks and I would like to get up there at first light and try and get some pictures, so I thought I needed a bit of a scout round to size up the location.

150mm, F5, 1/1000, ISO200
I only live about 17 miles away, but I don't go there often since it tends to be so full of dog walkers and joggers. I was there about 9-10am and it was fairly quiet. There is a large deer enclosure which is not open to public access, but there are many large gaps in the fence, so the deer are not restricted to this area. However, they do tend to retreat into it once disturbed. It is quite useful for the photographer since, whilst deer outside the enclosure are very wary and not easily approached, once inside they clearly know they are OK and are much less bothered. Indeed you can often walk up to the fence right next to them even though, a minute or two ago, the same animals when they were outside of the fence would not let you anywhere near!

85mm, F8, 1/125, ISO200


The stags are now in good condition with their antlers fully formed and cleaned of velvet, although they are still in all male herds as yet. There was a bit of sparing going on amongst the younger males. The rut generally gets under way about mid October.

Saturday, September 21, 2013

Digiscope vs telephoto

I posted a digiscoped picture of a Little Egret on a photographic forum and got various comments that it was a bit soft. I responded that I would expect that of pictures taken through a telescope. That got me thinking, why should I expect poorer results through a telescope than using a telephoto lens?

My answer is that a telephoto is optimised for photography whereas a telescope is optimised for viewing directly via the human eye. When designing photographic lenses, one of the big issues is forming an image with a flat plane of focus - especially when it is for a the lage sensor found in an SLR. Lenses don't naturally focus the light coming off centre to the same plane - hence spherical aberration. That, and correcting for chromatic aberration, are the reasons why photographic lenses end up with so many elements and go in for using exotic glasses for some of those elements (and, consequently, are heavy and expesive ...). A telescope, on the other hand, is designed to be viewed directly by the human eye - which has a curved retina. So a flat field of focus is not optimal. Also the human eye does not work like a camera sensor. There is a very good article about this on Cambridge in Colour.

So I decided to set up a test to compare the images I get through my Kowa TSN 823 telescope with the same subject using my Sigma 150-500mm telephoto. I downloaded an ISO 12233 Test Chart from here. The chart comes as a PDF and is intended to be 400x240mm. So I laser printed it on A3 paper, doing my best to setup the printer to achieve that size (and got pretty close), and mounted it on 3mm foam core board. I set the chart up in the garden with the telescope on a tripod positioned so the target just filled the frame (which was at 21m). I then replaced the telecope with the 500mm lens without moving the tripod, and took a couple of pictures with the chart at the centre and edge of the 500mm's field of view.

My reasoning was that if I am out bird watching somewhere and I see something interesting then I have two options (assuming it is not feasible to get closer - which is often the case). I can try digiscoping it or I can use the 500mm and then crop the resulting image. The three images below show the chart through the telescope with the eyepiece magnification set to its lowest power, the chart through the Sigma 150-500mm set to its max focal length, and the latter cropped to just the target. All three are the full original frame images resized to a width of 1024 pixels to achieve an size I could load here. Exposure: It was a bright day with some blue patches - so bright daylight, but not full sunshine. I set Tv mode on the Canon 60D and a shutter speed of 1/1000 (my usual setting for bird photographs), had the leans wide open and the "Auto ISO" setting so that the ISO went as high as necessary to get an exposure. I dialled in +2/3EV exposure compensation to deal with the fact that the target is mainly white paper. The ISO for the digiscope was around 3000 and for the telephoto around 1800.

Target through digiscope (minimum magnification).

Target through Sigma 150-500mm lens at max focal length.

Image above cropped to just the target.
Here are 100% crops from the centre and edges of the digiscoped image:
Digiscope centre

Digiscope, edge
And here are 100% crops of the same areas from the telephoto shots. The "edge" shot is from a second image through the telephoto with the target positioned at the edge of the field of view. (These are of course smaller images because the magnification was less).

Telephoto centre
Telephot edge


The digiscoped image shows significant noise because of the high ISO, but it is also clear that, as expected, there is a much more marked difference between the centre and the edge than in the case of the telephoto images. But, overall the digiscoped image is not bad. Of course, the Sigma 15-500mm is not the sharpest lens going when used at the 500mm setting. It would have been nice to compare a long, prime lens - but I haven't got one ...

Just for interest, I also took shots through the digiscope at 30x, 40x and 60x eyepice magnifications.These are the full frame that resulted (resized to a width of 1024 pixels).

30x
40x

60x
There is very little EXIF information in these image files (because I am using an old Olympus 50mm lens on the camera with no electronic coupling), but the ISO went sky high by the time I reached 60x magnification - and the noise is very evident! Also there is an increasing magenta cast. Even so, I was quite surprised how clear the image was even at 60x.

Friday, September 20, 2013

Tachinid

Tachinidae (Eurithia sp. ?)
This spiny fly is a Tachinid, I think possibly a Eurithia species looking at the stuff on the Tachinid recording scheme web-site. However, I don't claim to be able to recognise members of this family and I didn't manage to catch it. It was sitting about on the vegetation around my garden pond. The general appearance is pretty typical for the family - very spiny, especially with large upstanding spines on the abdomen.

The larvae are generally internal parasites of other insects, especially moth caterpillars. If I am right about this one's identity, then species of this genus parasitise quite a range of larger moths, especially Noctuids and Arctids.

EDIT: Chris Raper of the Tachinid Recording Scheme confirmed the generic identification, "Yes, that's certainly a Eurithia sp. but it's hard to go further because we can't see the 5th tergite very well."

Thursday, September 19, 2013

Focal length equivalent of digiscope

I posted a digiscoped picture of a Little Egret on Talk Photography and, amongst the comments, got asked "What was the focal length more or less (35mm equiv.)". I only had a fairly vague idea based, on the fact that the magnification is clearly more than I get from my Sigma 150-500mm lens. After a lot of searching, I found Digibird.com which offers a downloadable Excel spreadsheet to calculate a mass of information about a digiscoping setup.

It is pretty easy to use, you fill in the parameters of your setup in the yellow area at the top and it delivers a table of results - including the effective focal length and f-stop of the "lens".

My main problem was filling in all the required details. The diameter of the objective lens of the telescope was easy - its called "TSN 823" - and the 82 part is the diameter of the objective in mm. Anyway, if I was stuck I could always get out a ruler and measure it! What stumped for some time me was the focal length of the telescope's objective. This particular model is no longer made by Kowa, so there is nothing on their web site. However, after a lot of searching, I did manage to find specifications which gave me an answer: 450mm. The telescope has a 15-60x zoom eyepiece and I rarely use anything other than the minimum setting for digiscoping - so the magnification in this case was set at 15x.

The camera side was easier, The dimensions of the resulting image in pixels is easy (just check the properties of the image file) and I use an old Olympus Zuiko 50mm f1.8 standard lens on the camera (see this post for details of mounting the camera on the 'scope). Its a prime lens so the max zoom must also be 50mm and, since the Camera (Canon EOS 60D) has an APS-C sensor with a 1.6x crop factor, the 35mm equivalent focal length is 50 x 1.6 = 80mm.

The distance to the object (the Little Egret) I am just guessing, but it does not make any difference to the calculation I am interested in, the focal length of the setup.

So we have our answer: its effectively a 750mm F9 lens (or 1229mm 35mm equivalent). If I bump the magnification up to 20x, then it is 1000mm F12 lens or (1638 35mm equivalent). At 60x is would be a 3000mm F37 lens (5000mm 35mm equivalent) but, in my experience, the higher magnifications are unusable for digiscoping. The light getting through is just too dim (F37!) and the quality of the image is frankly dreadful!

Wednesday, September 18, 2013

Mirror lock-up

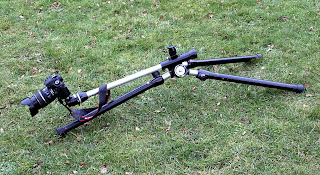
I tried a little experiment this evening. Today was quite dull and cool, but the sun came out as I was coming home from work and I noticed quite a collection of flies sunbathing on the shed roof in the garden (Sarcophaga - Flesh Flies, Pollenia - the cluster fly, Calliphora - Blue-bottles and Dasyphora type shiny green muscids). Because it was still coolish, they were quite sluggish and not inclined to move. So I decided to have a go at some piccies. I set up my Canon 100mm Macro on the Canon EOS 60D mounted on a old Olympus focus rail on the Benbo tripod. Here is the same setup (taken on another occasion):


What I wanted to try was comparing shots with and without mirror lock-up to see if it made any noticeable difference. Since everything was setup on a sturdy tripod, the flies were sitting on a solid shed roof, and generally keeping quite still, this seemed a good opportunity to give it a go.

If you haven't come across the mirror lock-up setting before: In an SLR camera, when you press the shutter release, the mirror (which is used to direct light coming in through the lens to the viewfinder) has to flip up out of the way of the shutter before making the exposure. This is what makes most of the noise you hear when you press the release button. When you are using a lot of magnification (as in macro photography or shooting through a long telephoto lens) the vibrations caused by the "mirror slap" as it flips up and hits the roof of the mirror box can cause a degree of what is effectively camera shake and so degrade the image. Enabling the mirror lock-up setting separates the two actions of raising the mirror and releasing the shutter. You have to press the shutter release button (preferably via a remote release!) twice: The first press raises the mirror; then you wait a sufficient time for vibrations from the mirror slap to have damped down before you press the button for the second time to actually release the shutter and take the shot. A couple of seconds is generally reckoned to be enough, although I have seen as long as 8 seconds suggested. On the 60D the mirror lock-up Enable/Disable function is the fifth option on the  "C.Fn III: Autofocus/Drive" menu. (Hint: remember to disable it again afterwards or it can be very disconcerting the next time you use the camera!.)

Here is a blue-bottle (Calliphora erythrocephala) busily engaged in one of its favoutite activities - expelling and re-ingesting droplets of saliva (often described as "blowing bubbles"). Exposure: 100 ISO, F16, 1/5 second. It was on the roofing felt of the shed which makes for rather a dark background, so with -1EV exposure compensation. The lens was set to a magnification of 1.5:1 and to Manual focus. I then focussed by moving the camera backwards and forwards using the focus rail. This image is somewhat cropped round the fly, but otherwise straight from the RAW file using UFRaw's default settings and with no additional processing (no sharpening).


I took five shots on these settings with mirror lock-up enabled and another five with it disabled. All shots were taken using a wired remote control to release the shutter. In the case of the mirror lock-up shots, I waited approx 4 seconds (estimated by counting) between the first press to raise the mirror and the second press to release the shutter.

Here are 100% crops of the head and thorax from what I considered by visual inspection to be the sharpest of each set of five.

With mirror lock-up enabled

With mirror lock-up disabled
I reckon there is a discernible difference with the facets of the eye and the fine hairs on the margins of the thorax being slightly clearer in the image taken with mirror lock-up enabled and I think this is pretty typical across all the shots I took.

Tuesday, September 17, 2013

Using Hugin for focus stacking

Hugin is free and open source software that describes itself as a "Panorama photo stitcher" and, indeed, that is what the GUI provided as part of the package does. But, under the bonnet, it is a set of command line tools for manipulating and combining graphics files and it can also be used for combining shots to produce High Dynamic Range images and focus stacking.

For the purposes of focus stacking (i.e. combining images taken at different focus points to produce a single image with extended depth of field), two of the command line tools are key:
align_image_stack.exe
As its name suggests, this tool aligns images so that the same features are in exactly the same place in each.It automatically finds features.
enfuse.exe
Merges images together. It has a wide range of options which allow it to be used in all sorts of ways including focus stacking.

These tools can be found in the \Hugin\bin directory of your Hugin installation. Another significant file is enfuse.pdf, which can be found in the \Hugin\doc\enblend directory of your installation. This documents enfuse's options and has a useful section on focus stacking.

Chrysogaster solstitialis female
Take this as a reference image. It is a combination of 16 shots of a fresh, dead specimen taken at roughly twice life size (I intend to cover the equipment and techniques used in future posts). The original images are in RAW format from my Canon EOS 60D. This image was produced using Zerene Stacker 1.0.4 (my favourite stacking software and, in my opinion, "best of breed" at the moment).

The first step is to "develop" the RAW files to TIFFs. Most stacking software (including Zerene Stacker) works from TIFFs (the exception I know of is Helicon Focus which will handle the RAW conversion itself). I use Canon's Digital Photo Professional software (supplied with the camera) to do batch RAW conversions like this.

Bottom, middle and top original images from the stack
Here are three TIFF images from the top, bottom and middle of the stack. Note the somewhat grey background, the stage on which the insect is mounted (blue) and the head of the pin showing just left of the middle of the thorax. These have been cleaned up in post-processing the finished image above (using GIMP).

The next step is to align the images. This will do two things.
  1. Shift the images in the x and/or y axes to correct for any changes in their position. This will occur if the axis of the camera is not exactly aligned at 90°to the plane of the specimen. In practice, it is almost impossible to align things that accurately and, at these magnifications, even a very slight deviation off true will have a visible effect.
  2. Corrects for the inevitable change in magnification between images. As we move the camera nearer and further from the specimen, or change the focus of the lens, to cover the different focal planes, we inevitably change the magnification slightly.

Assuming that the \Hugin\bin directory is in your PATH environment variable (so that Windows can find Hugin's executable files) and that you are running the command from the directory where the TIFF images are located, the command will look like this:

"align_image_stack.exe" -a "\work\align_" -m -v <comma separated list of the .TIF file names>

This will probably take a minute or two and result in a set of files called align_nnnn.tif in a subdirectory \work from the directory where the original image files were located.

The -a switch allows you to set a prefix for the output images (otherwise they will just over-write the originals), -v means "verbose output messages" (not necessary, but allows you to watch progress as it runs) and -m tells it to correct the magnification of all but the first image (otherwise it only considers x,y shifts and rotations).

We can now combine the images using enfuse. The command is like this:

"enfuse.exe" -o "result.jpeg" --compression=100 --contrast-weight=1.00 --exposure-weight=0.00 --saturation-weight=0.00 --contrast-window-size=5 --hard-mask --gray-projector=luminance <comma separated list of the align_nnnn.TIF file names>

The key setting here is that we are telling it to use contrast-weight=1.00 but not exposure-weight or saturation-weight - this is what makes it do focus stacking. The contrast-window-size=5 sets the size of the window it uses to scan over the images to determine which has the highest contrast (i.e. is the most focussed). It should be an odd number and 5 or 7 are common values. See the documentation in enfuse.pdf for more details.

Here is the result.jpg that it produced (scaled to the same size as the reference image above):


Here is a comparison of the Hugin result to the output from Zerne Stacker (before post-processing) taking just a small part of the image around the base of the left wing:

Hugin left, Zerene Stacker right
There really is not a lot of difference that I can detect. Perhaps a little more hallowing around the knee of the hind leg in the Hugin result.

In conclusion, I would say that Hugin provides a good, free set of tools for focus stacking and the results can be excellent. The major downsides are:
  • align_image_stack.exe is slow! It does not take advantage of a multiple core CPU (and this is a job which is made for parallel processing!). Software such as Zerene Stacker and Helicon focus have optimised this step for mutliprocessors and it really shows! (enfuse.exe does have a multiprocessor optimised option though).
  • it is quite "techie" and means you have to dive in and get your hands dirty at the command prompt. I tackled this by writing my own GUI (in Delphi) which acts as a front end for these two command line tools and makes the whole process much easier.

Monday, September 16, 2013

Mint Moth

The weather was quite good on Saturday morning and I was a little surprised to see that the Mint Moth (Pyrausta aurata) was still flying in my garden.


This is a rather pretty day flying micro-moth of the family Crambidae and, according to the UK Moths web-site, its larvae feed on a wide range of garden herbs but particularly marjoram (Origanum vulgare) and several species of mint, e.g. spearmint (Mentha spicata) and apple mint (M. rotundifolia). We have lots of majoram and grow patches of both of these mints for cooking purposes. However, I most often see the moths sitting in the sunshine on a large leaf. This weekend they were most noticeable basking on the leaves of our buddleja.

These moths appear, in my garden, as early as the second half of April and are probably most numerous in May and early June and then occur right through the summer and evidently into mid September. Again, according to the UK Moths web-site, they have two generations per year in May/June and July/August.

The NBN Gateway shows the distribution extending across the southern half of Great Britain north to around Merseyside with a couple of outlying records from the Arneside area.

Sunday, September 15, 2013

Benbo tripod

The Benbo tripod is a truly amazing piece of kit for the natural history photographer! I bought mine, an original Benbo Mk I made by Kennett Engineering, in the mid-1980s. It has served me well and the only maintenance it has required has been occasional greasing of the tightening mechanism and replacement of one of the rubber feet (which split). I think I was influenced to buy it by Heather Angel's recommendations, for example in her "Book of Nature Photography". She appears in a video demonstrating it on YouTube.

The legs and central column of the Benbo are joined by a bent bolt which allows the legs to be moved out at unlikely angles. The name "Benbo" apparently comes from the initial letters of the words "bent bolt". The idea is supposed to have come from the tripod designed for the Bren gun in WWII.


This unusual design means that all the legs and centre column are freed to move just by undoing the single tightening lever. Everything can be arranged as you want and then tightened again with a single twist. This makes it easy to set up even on the most uneven ground and in awkward positions. For example, the tripod can lie flat with the central column parallel to the ground to get a low angle of view tp photograph plants and insects on them.

Or it can be set up against a tree to photograph stuff on the trunk.

Also, because the telescopic legs have the largest tube on the outside (opposite to most tripod legs where the largest tube is at the base and the others fit inside it) the legs are sealed at the end and therefore fully waterproof. So you can put the legs into a pond or ditch without any worries of getting mud carried up into the locking mechanism when you next retract them. Very useful for photographing stuff on the water surface or on floating leaves.


It is a big, heavy, solid tripod equipped, as you can see, with a hefty ball-and-socket head. So it is not something I like to carry for any great distance, but provides very solid camera support.

If you want one, you need to know bit of history: The Benbo was original made by Kennett Engineering, a small company set up by two engineers, Chris Mills and Ken Brett, in Leighton Buzzard in the West Midlands. They eventually produced a whole range of Benbos from Mk I to Mk. VII, with the higher numbers generally being bigger and heavier versions (except for the small and light Mk VII). The Mk V was huge weighing in at 22lbs and extending to 10ft! They eventually sold out to Paterson Photographic based in Tipton, also in the West Midlands who still make Benbos - although the design and manufacture has changed (some say cheapened!) over the years and most of the parts are now made elsewhere and just assembled in Britain. The current range includes the Mk I and bigger Mk II, but also includes a smaller, carbon fibre versions (Benbo Trekker) based on Kennett's Mk. VII. But, once the "non-competiton" clause of their agreement with Paterson ran out, Chris and Ken started a new company, Uni-Loc Tripods, in Leighton Buzzard making an updated version of the same design. There is a brief account of this here. They eventually sold out to "Envoy" who still market tripods under the "Uniloc" name from a base in Herts.

So, you can consider the current Benbo models from Paterson Photographic or look at the Uniloc range from Envoy.